Create your first simulator connector
Prerequisites
You should have completed:
- Prerequisites & Setup - Development environment ready
Step 1: Create a new simulator connector project
Download the Cognite Simulator Utils from NuGet.
To create a console application and add the latest version of the library, open the terminal and run the commands below:
dotnet new console -o NewSimConnector
cd NewSimConnector
dotnet add package Cognite.Simulator.Utils --prerelease
Note: The
--prereleaseflag is required to install the latest version of the library (alpha).
Step 2: Create a configuration file
Create a config.yml file in your project root. This file contains CDF connection settings and connector configuration.
version: 1

logger:
    console:
        level: "debug"

cognite:
    project: ${COGNITE_PROJECT}
    host: ${COGNITE_HOST} # e.g : https://bluefield.cognitedata.com
    # This is for Microsoft Entra as an IdP. To use a different provider:
    # set implementation: Basic, and use token-url instead of tenant.
    # See the example config for the full list of options.
    idp-authentication:
        # Directory tenant
        tenant: ${COGNITE_TENANT_ID}
        # Application ID
        client-id: ${COGNITE_CLIENT_ID}
        # Client secret
        secret: ${COGNITE_CLIENT_SECRET}
        # List of resource scopes. Example:
        # scopes:
        #   - https://api.cognitedata.com/.default
        scopes:
          - ${COGNITE_SCOPE}

connector:
  name-prefix: "new-sim-connector@"
  # Data set ID to keep all the simulator resources
  data-set-id: ${COGNITE_DATA_SET_ID}
This file contains the configuration required to connect to the CDF project, define the target data set ID, and set the connector name.
Make sure you populate the environment variables with the correct values. You can also hardcode the values in the configuration file for the development environment.
Step 3: Define the Simulator contract
Create SimulatorDefinition.cs. This defines the contract between your simulator and CDF.
using CogniteSdk.Alpha;

static class SimulatorDefinition
{
    public static SimulatorCreate Get()
    {
        return new SimulatorCreate
        {
            ExternalId = "Excel",
            Name = "Excel",
            FileExtensionTypes = new List<string> { "xlsx", "xlsm" },
            ModelTypes = new List<SimulatorModelType>
            {
                new SimulatorModelType
                {
                    Name = "Spreadsheet",
                    Key = "Spreadsheet",
                }
            },
            StepFields = new List<SimulatorStepField>
            {
                // Define fields for Set/Get operations
                new SimulatorStepField
                {
                    StepType = "get/set",
                    Fields = new List<SimulatorStepFieldParam>
                    {
                        new SimulatorStepFieldParam
                        {
                            Name = "sheet",
                            Label = "Sheet Name",
                            Info = "Name of the worksheet (e.g., 'Sheet1')",
                        },
                        new SimulatorStepFieldParam
                        {
                            Name = "cell",
                            Label = "Cell Reference",
                            Info = "Excel cell reference (e.g., 'A1', 'B2', 'C3')",
                        },
                    },
                },
                // Define fields for Command operations
                new SimulatorStepField
                {
                    StepType = "command",
                    Fields = new List<SimulatorStepFieldParam>
                    {
                        new SimulatorStepFieldParam
                        {
                            Name = "command",
                            Label = "Command",
                            Info = "Select a command",
                            Options = new List<SimulatorStepFieldOption>
                            {
                                new SimulatorStepFieldOption
                                {
                                    Label = "Pause Calculations",
                                    Value = "Pause",
                                },
                                new SimulatorStepFieldOption
                                {
                                    Label = "Perform Calculation",
                                    Value = "Calculate",
                                }
                            },
                        },
                    },
                },
            },
            UnitQuantities = new List<SimulatorUnitQuantity>
            {
                new SimulatorUnitQuantity
                {
                    Name = "Unitless",
                    Label = "Unitless",
                    Units = new List<SimulatorUnitEntry>
                    {
                        new SimulatorUnitEntry { Name = "", Label = "" },
                    },
                },
            },
        };
    }
}
This contract defines file types, model types, how to address cells, and supported units. It is registered with CDF on connector startup.
Step 4: Create COM Configuration
Create NewSimAutomationConfig.cs to configure the COM connection to Excel.
using Cognite.Simulator.Utils.Automation;

public class NewSimAutomationConfig : AutomationConfig
{
    public NewSimAutomationConfig()
    {
        ProgramId = "Excel.Application";
    }
}
The ProgramId is the registered COM identifier for the application.
Step 5: Implement the Simulator Client
Create NewSimClient.cs, which implements the ISimulatorClient interface for simulator interaction.
using Cognite.Simulator.Utils;
using Cognite.Simulator.Utils.Automation;
using CogniteSdk.Alpha;
using Microsoft.Extensions.Logging;

public class NewSimClient : AutomationClient, ISimulatorClient<DefaultModelFilestate, SimulatorRoutineRevision>
{
    private readonly SemaphoreSlim semaphore = new SemaphoreSlim(1, 1);
    private string _version = "N/A";
    private readonly ILogger logger;

    public NewSimClient(ILogger<NewSimClient> logger, DefaultConfig<NewSimAutomationConfig> config)
            : base(logger, config.Automation)
    {
        this.logger = logger;
    }

    public async Task TestConnection(CancellationToken _token)
    {
        await semaphore.WaitAsync(_token).ConfigureAwait(false);
        try
        {
            Initialize();
            _version = Server.Version;
        }
        finally
        {
            Shutdown();
            semaphore.Release();
        }
    }

    protected override void PreShutdown()
    {
        Server.Quit();
    }

    public dynamic OpenBook(string path)
    {
        dynamic workbooks = Server.Workbooks;
        return workbooks.Open(path);
    }

    public async Task ExtractModelInformation(DefaultModelFilestate state, CancellationToken token)
    {
        ArgumentNullException.ThrowIfNull(state);
        await semaphore.WaitAsync(token).ConfigureAwait(false);
        try
        {
            Initialize();
            dynamic workbook = OpenBook(state.FilePath);
            if (workbook != null)
            {
                workbook.Close(false);
                state.ParsingInfo.SetSuccess();
                return;
            }
            state.ParsingInfo.SetFailure();
        }
        finally
        {
            Shutdown();
            semaphore.Release();
        }
    }

    public string GetConnectorVersion(CancellationToken _token)
    {
        return "N/A";
    }

    public string GetSimulatorVersion(CancellationToken _token)
    {
        return _version;
    }

    public async Task<Dictionary<string, SimulatorValueItem>> RunSimulation(DefaultModelFilestate modelState, SimulatorRoutineRevision routineRev, Dictionary<string, SimulatorValueItem> inputData, CancellationToken token)
    {
        ArgumentNullException.ThrowIfNull(modelState);
        await semaphore.WaitAsync(token).ConfigureAwait(false);
        dynamic? workbook = null;
        try
        {
            Initialize();
            workbook = OpenBook(modelState.FilePath);

            return null;
        }
        finally
        {
            if (workbook != null)
            {
                workbook.Close(false);
            }
            Shutdown();
            semaphore.Release();
        }
    }
}
Step 6: Configure Dependency Injection
Create ConnectorRuntime.cs to set up the SDK runtime and dependency injection.
using Cognite.Simulator.Utils;
using Cognite.Simulator.Utils.Automation;
using CogniteSdk.Alpha;
using Microsoft.Extensions.DependencyInjection;

public static class ConnectorRuntime
{
    public static void Init()
    {
        DefaultConnectorRuntime<NewSimAutomationConfig, DefaultModelFilestate, DefaultModelFileStatePoco>.ConfigureServices = ConfigureServices;
        DefaultConnectorRuntime<NewSimAutomationConfig, DefaultModelFilestate, DefaultModelFileStatePoco>.ConnectorName = "NewSim";
        DefaultConnectorRuntime<NewSimAutomationConfig, DefaultModelFilestate, DefaultModelFileStatePoco>.SimulatorDefinition = SimulatorDefinition.Get();
    }

    static void ConfigureServices(IServiceCollection services)
    {
        services.AddScoped<ISimulatorClient<DefaultModelFilestate, SimulatorRoutineRevision>, NewSimClient>();
    }

    public static async Task RunStandalone()
    {
        Init();
        await DefaultConnectorRuntime<NewSimAutomationConfig, DefaultModelFilestate, DefaultModelFileStatePoco>.RunStandalone().ConfigureAwait(false);
    }
}
This class registers the NewSimClient, sets the connector name, provides the simulator definition, and starts the runtime.
Step 7: Create Program Entry Point
Replace the contents of Program.cs with the following:
public class Program
{
    public static int Main(string[] args)
    {
        RunStandalone();
        return 0;
    }

    private static void RunStandalone()
    {
        ConnectorRuntime.RunStandalone().Wait();
    }
}
Step 8: Build and Run
Build and run the project:
dotnet build
dotnet run
Step 9: Verify in CDF
Open Cognite Data Fusion and navigate to Simulators. Click on the Integrations tab. You should be able to see your connector here with a @<hostname> suffix.
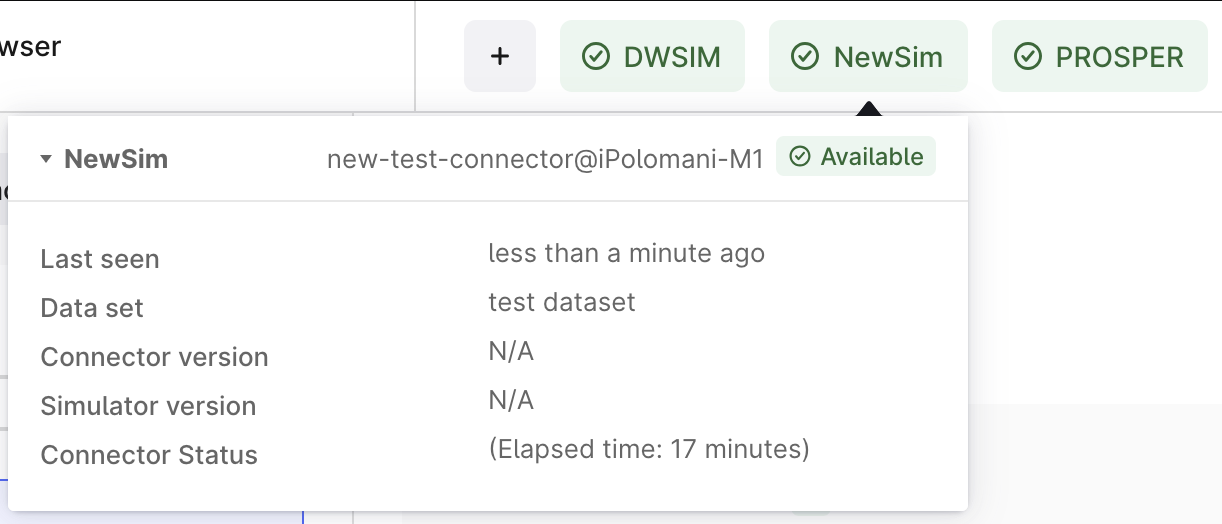
If you don't see your connector, check your config.yml credentials and logs for errors.
Understanding What Happens at Runtime
When you run the connector, it loads the configuration, establishes a COM connection to Excel, authenticates with CDF, registers the simulator definition, starts a heartbeat loop to report its health, and begins polling for jobs
Learn more about how connectors register and maintain heartbeat.
Next Steps
Your connector foundation is complete! Continue with the tutorial:
- COM Connection Deep Dive - Master COM automation patterns and best practices
- Model Parsing - Extract detailed model information from your simulator
- Implement Routines - Add simulation execution capabilities
Ready to continue? Head to COM Connection Deep Dive to learn more about working with Excel via COM automation.